· Automotive Maintenance · 22 min read
How To Clean Brake Calipers
Cleaning Brake Calipers for Better Performance
Have you ever looked at your car’s wheels and noticed an unsightly layer of black or reddish-brown grime? This often comes from brake dust and road dirt. This dirt coats your brake calipers. Cleaning brake calipers is not just about making your car look good. It helps keep your braking system working well. Dirty calipers can lead to problems over time.
Keeping your calipers clean prevents corrosion and ensures proper function. It helps extend the life of your brake components. This guide will show you how to clean brake calipers thoroughly. We will cover necessary tools, step-by-step instructions, and important safety tips. You will learn the best ways to tackle grime, rust, and old brake dust. Get ready to give your braking system the care it deserves.
Takeaway
- Regularly clean brake calipers to maintain brake health and car aesthetics.
- Gather the right tools: brake cleaner, wire brush, safety gear.
- Follow a step-by-step process for thorough cleaning, whether on or off the car.
- Prioritize safety by using jack stands and eye protection.
How do you clean brake calipers?
Cleaning brake calipers involves removing the wheel, detaching the caliper (or cleaning in place), spraying with brake cleaner to dissolve grime, scrubbing with a brush, and then rinsing. This process removes brake dust and dirt, improving performance and appearance.
Why Clean Brake Calipers? Understanding the Benefits
Many car owners wonder if cleaning brake calipers is truly important. The answer is yes, it plays a vital role in both your car’s performance and its appearance. Brake calipers are hardworking components. They constantly face high heat, friction, and exposure to road elements. This makes them prone to accumulating dirt, grime, and brake dust. This buildup can cause problems if left unchecked.
First, performance is a major benefit. A clean caliper allows heat to dissipate more effectively. This reduces the risk of brake fade during heavy use. It also helps moving parts within the caliper operate smoothly. Pistons can seize or stick if too much dirt builds up around them. This affects braking power and overall safety. Regular cleaning prevents these issues.
Second, cleaning calipers improves your vehicle’s look. Brake dust makes wheels appear dirty, even if the wheels themselves are clean. Clean calipers enhance the overall aesthetic of your car. They look good through open-spoke wheels. Many people invest in custom wheels. Dirty calipers can spoil the effect of nice wheels.
Finally, regular cleaning helps with inspection. When calipers are clean, you can easily spot any signs of wear, cracks, or leaks. Early detection of problems can save you money and prevent more serious issues. It also extends the lifespan of your brake components. This reduces the need for frequent replacements. Cleaning your calipers is a simple maintenance task with big payoffs.
Essential Tools and Materials for Brake Caliper Cleaning
Before you start the job, gathering the right tools and materials is important. Having everything ready saves time and ensures a smooth cleaning process. You do not want to stop in the middle to look for a forgotten item. Safety gear is always first on the list. Protecting yourself from chemicals and debris is critical.
You will need a few key items to perform a thorough clean. A good quality brake cleaner is non-negotiable. This product is designed to cut through grease, brake dust, and oil without damaging brake components. You should use a solvent-based brake cleaner for effective results. Make sure to buy enough for the job.
Next, you will need various brushes. A stiff wire brush is excellent for removing stubborn grime and rust from metal surfaces. A smaller, stiffer brush, like a toothbrush or a dedicated detail brush, helps get into tight spots. You might also want a soft bristled brush for general cleaning. Different brush types help you reach all areas of the caliper.
Other supplies include rags or old towels, a bucket of soapy water, and possibly some general-purpose degreaser. A wheel brush can help clean your wheels once the calipers are sparkling. Remember that you may need a jack and jack stands to lift your car. A lug wrench is also needed to remove the wheels. Having these items ready makes the job much easier.
- Safety Gear:
- Safety glasses or goggles (essential for eye protection)
- Gloves (nitrile or chemical-resistant gloves are best)
- Dust mask (optional, but good for fine dust)
- Cleaning Agents:
- High-quality brake cleaner spray (multiple cans might be needed)
- General-purpose degreaser (for heavily soiled calipers)
- Mild car soap or dish soap (for final wash)
- Water (for rinsing)
- Brushes and Tools:
- Stiff wire brush (for heavy rust and grime)
- Smaller detail brushes (e.g., toothbrush, stiff nylon brush)
- Soft-bristled brush (for general cleaning)
- Rags or old towels (many of them)
- Bucket
- Vehicle Lifting Equipment (if removing wheels):
- Hydraulic jack
- Jack stands (always use for safety)
- Lug wrench or impact gun
Always read the instructions on your brake cleaner. Some cleaners may require specific ventilation or handling procedures. Being prepared ensures safety and efficiency during the entire cleaning process.
Step-by-Step Guide: Cleaning Brake Calipers Effectively
Cleaning your brake calipers is a manageable task for most car owners. It involves several key steps. Following these steps ensures a thorough and safe cleaning process. My method focuses on removing the wheel for best access. This allows you to clean all surfaces of the caliper.
Step 1: Prepare Your Vehicle and Workspace
First, park your car on a flat, level surface. Engage the parking brake. This prevents the car from rolling. Loosen the lug nuts on the wheel you plan to remove, but do not remove them completely yet. Use your jack to lift the car safely. Once the car is lifted, place jack stands under the vehicle’s frame. Never rely solely on the jack. Safety stands are crucial for working under a raised vehicle. After placing the stands, remove the lug nuts and the wheel. Now you have full access to the brake assembly.
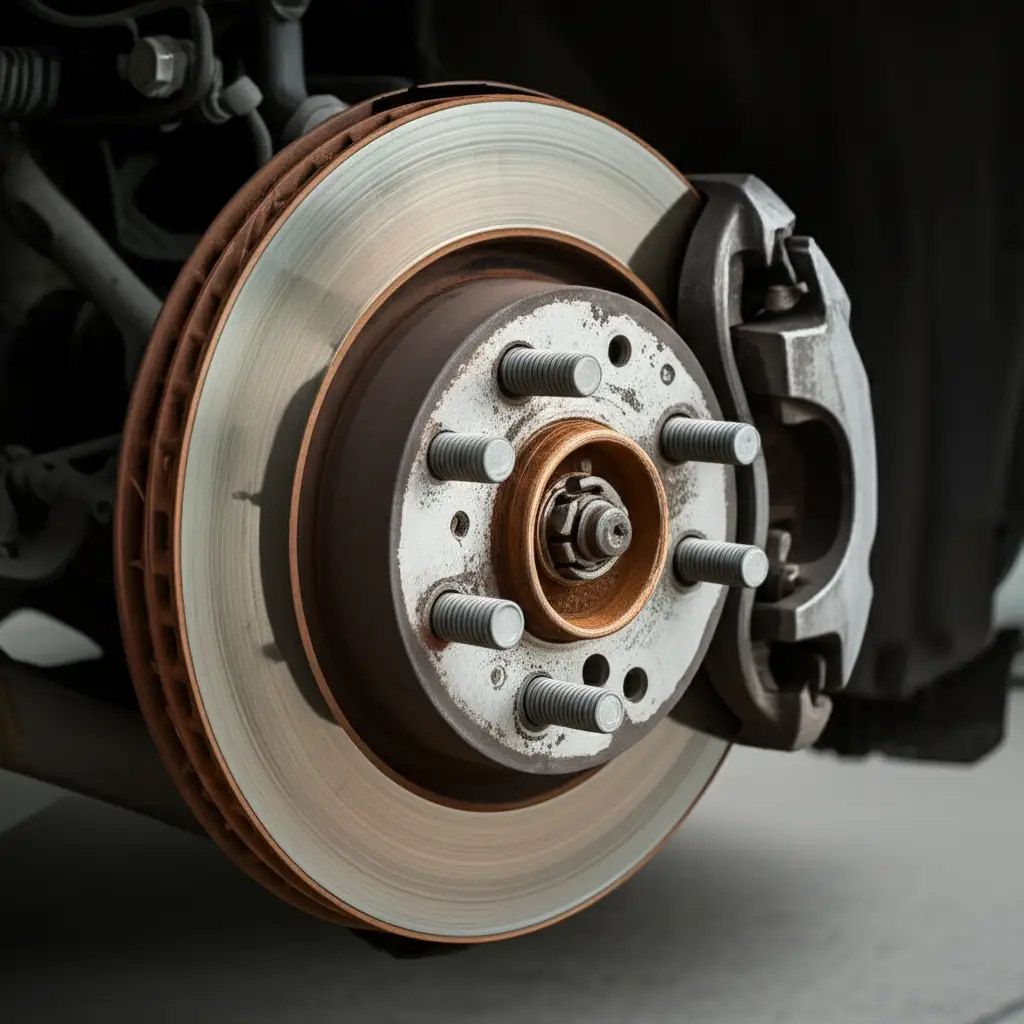
Step 2: Initial Inspection and Loose Debris Removal
With the wheel off, you can see the caliper clearly. Take a moment to inspect it. Look for any obvious damage or leaks. Use a brush or an old rag to wipe away loose dirt and dust. This helps prevent larger debris from scratching surfaces later. You want to remove as much dry dust as possible before applying liquids. This also makes the brake cleaner more effective.
Step 3: Apply Brake Cleaner and Scrub Away Grime
Now, spray the brake caliper generously with your chosen brake cleaner. Allow the cleaner to soak for a few minutes. This gives it time to break down stubborn grease and brake dust. Use your stiff wire brush to scrub away the loosened grime and rust. For areas with heavy buildup, you may need to spray and scrub multiple times. Pay attention to all sides of the caliper, including the areas around the brake pads and piston. It is important to clean brake pads too, as they also collect dust.
Step 4: Detail Cleaning and Rinsing
Once the major grime is gone, switch to a smaller detail brush. Use it to clean crevices and hard-to-reach spots. Re-spray with brake cleaner as needed. Ensure all visible dirt and brake dust are gone. After scrubbing, spray the caliper again with brake cleaner for a final rinse. This washes away any remaining residue. Let the caliper air dry completely or use compressed air if available. Do not wipe with a cloth immediately after rinsing with brake cleaner, as it evaporates quickly.
Step 5: Address Rust and Stubborn Stains
If you notice rust spots on the caliper, the wire brush will be your best friend. For persistent rust, you might need a rust converter product. Apply it according to the product instructions. If your brake rotors also show rust, learning how to clean rust off brake rotors can be helpful. This ensures your entire braking system looks good and performs well. Rust can affect the aesthetic and sometimes the function of brake parts.
Step 6: Reassembly and Final Touches
Once the caliper is dry and clean, reattach your wheel. Hand-tighten the lug nuts first. Lower the car off the jack stands. Then, lower the car completely to the ground. Now, use your lug wrench to tighten the lug nuts to the manufacturer’s recommended torque specifications. Repeat the process for the other wheels if you are cleaning all calipers. Test your brakes carefully at low speed after reassembly. Pump the brake pedal a few times before driving to ensure proper pressure builds up.
This detailed process ensures your brake calipers are not just clean but also well-maintained.
Cleaning Calipers Without Removing the Wheel
Sometimes, removing the wheel is not an option, or you simply want a quicker clean. You can still clean your brake calipers effectively without taking the wheels off. This method is great for light maintenance or if you lack the proper lifting equipment. While it offers less access, it still makes a noticeable difference. I find this approach useful for quick clean-ups between full detailing sessions.
First, you need to position your car correctly. Park on a flat surface and engage the parking brake. Turn your steering wheel fully to one side. This will expose the caliper on the front wheel more. For the rear wheels, turning the steering wheel won’t help as much, but you might still get enough access.
Next, use your garden hose to rinse away any loose dirt or mud. This initial rinse prevents scratching the surface during scrubbing. Be careful not to spray directly into any rubber boots or seals with high pressure. Water is just for dislodging the big chunks.
Then, spray the visible parts of the brake caliper generously with brake cleaner. Let it soak for a few minutes. Use a long-handled wheel brush or a smaller detail brush to scrub the caliper. Reach into as many areas as you can. A dedicated wheel brush often has bristles designed to reach behind spokes. This is very helpful when the wheel is still on. You might need to move your car forward or backward a bit to expose different parts of the caliper. This helps you reach all sides.
After scrubbing, rinse the area again with a gentle stream of water. Ensure all cleaner residue washes away. Allow the caliper to air dry. This method might not get your calipers as spotless as a full removal, but it significantly improves their appearance. It also helps remove corrosive brake dust. This method is also useful for cleaning brake rotors without removing the wheel. Remember, regular light cleaning is better than no cleaning at all.
Deep Cleaning Severely Dirty or Rusted Calipers
Some brake calipers might have years of accumulated grime, thick layers of brake dust, or significant rust. For these situations, a basic cleaning might not be enough. You need a deeper, more aggressive approach. I often see calipers that look like they have never been cleaned. They require extra effort. Tackling heavily soiled calipers makes a huge difference.
Addressing Heavy Grime and Brake Dust
For calipers covered in thick, caked-on brake dust, start by scraping off the heaviest deposits. A plastic scraper or old stiff brush can help with this. Be careful not to scratch the caliper surface. After scraping, saturate the caliper with a powerful degreaser or a heavy-duty brake cleaner. Let it sit for a longer period, perhaps 10-15 minutes, to really break down the grime. You might need to reapply the cleaner multiple times. Use a stiff wire brush to agitate the dirt. For very stubborn spots, a small brass brush can be effective. Brass is softer than steel, so it is less likely to damage the caliper. A pressure washer, used carefully at a distance, can also help blast away loose debris. Always keep the nozzle moving and do not focus too long on rubber seals.
Dealing with Significant Rust
Rust on brake calipers is common, especially in areas with harsh weather. Surface rust is usually fine, but heavy rust can look bad and might affect heat dissipation. After removing major grime, focus on the rust. A wire brush attachment on a drill or an angle grinder with a wire wheel can quickly remove extensive rust. Caution: This creates sparks and rust particles. Always wear full safety gear, including eye protection, gloves, and a dust mask. Be very careful not to damage brake lines or rubber components. If the rust is severe, consider removing the caliper entirely for better access. You can even use rust removal gels or acids, but follow their instructions very carefully and neutralize them afterward. After removing the rust, you might consider painting the calipers with high-temperature caliper paint. This protects them from future corrosion and gives them a fresh look.
What if Calipers are Too Far Gone?
In some extreme cases, calipers might be beyond simple cleaning and restoration. If there is deep pitting from rust, or if pistons are seized and cannot be moved, replacement or professional rebuilding might be necessary. Look for signs of fluid leaks around the piston boots or connecting lines. If you see fluid, stop and consult a mechanic. This indicates a serious problem. While cleaning improves appearance and function, it cannot fix damaged internal components. Always prioritize safety over aesthetics when it comes to your braking system.
Deep cleaning requires patience and the right tools. It can transform severely neglected calipers. The effort is worth it for improved appearance and potential longevity of your brake system.
Maintaining Clean Brake Calipers: Prevention and Regular Care
Cleaning your brake calipers once is a good start, but maintaining their cleanliness is even better. Regular care prevents heavy buildup and keeps them looking good year-round. Think of it as preventative maintenance. It saves you from having to do major deep cleans later. I have found that a little effort often saves a lot of work in the long run.
One of the easiest ways to maintain clean calipers is through regular car washing. When you wash your car, pay extra attention to your wheels and the visible parts of the calipers. Use a wheel cleaner designed to dissolve brake dust. Many wheel cleaners are acid-free and safe for various wheel finishes. Spray the cleaner on, let it dwell for a few minutes, then agitate with a soft wheel brush. Rinse thoroughly. This simple step removes fresh brake dust before it has a chance to bake onto the caliper surface.
Consider applying a sealant or ceramic coating to your calipers after a thorough cleaning. These products create a slick barrier. This barrier makes it harder for brake dust and grime to stick. It also makes future cleaning much easier. The dust simply rinses off with water or a mild soap. High-temperature ceramic coatings are available specifically for brake components. They offer excellent protection against heat and contaminants. This can keep your calipers cleaner for longer periods.
Regular inspection is also part of maintenance. Whenever you check your tire pressure or rotate your tires, glance at your calipers. Look for any new buildup or signs of issues. If you notice a quick accumulation of brake dust, it might indicate a problem with your brake pads wearing down quickly. Address minor issues before they become major problems.
Finally, think about your driving habits. Frequent hard braking generates more heat and more brake dust. While you cannot avoid braking, understanding this helps you understand why your calipers get dirty. Gentle, progressive braking can reduce dust generation. By combining regular washing, protective coatings, and mindful driving, you can keep your brake calipers looking great and functioning properly with minimal effort.
Common Mistakes to Avoid When Cleaning Calipers
When you clean brake calipers, it is easy to make simple mistakes. These errors can waste your time or even damage your brake components. My goal is to help you avoid these pitfalls. Knowing what not to do is just as important as knowing what to do.
Mistake 1: Not Using Proper Safety Gear
Many people skip safety glasses or gloves. Brake cleaner can irritate skin and eyes. Rust and dirt particles can fly when scrubbing. Always wear safety glasses or goggles. Chemical-resistant gloves protect your hands. A dust mask is good for dusty environments. Neglecting safety can lead to painful injuries.
Mistake 2: Using the Wrong Cleaning Products
Do not use harsh, corrosive cleaners that are not designed for automotive parts. Household cleaners, strong acids, or basic degreasers can damage rubber seals, paint, or metal finishes on your calipers. Always use dedicated brake cleaner. Brake cleaner is formulated to be safe for brake components. It evaporates quickly and leaves no residue. Read product labels carefully.
Mistake 3: Spraying Directly onto Rubber Boots or Seals
Brake calipers have rubber boots that protect the piston and guide pins. These rubber parts are critical. Spraying high-pressure streams of brake cleaner directly onto them repeatedly can degrade the rubber over time. This leads to cracking or tearing. When spraying, aim for the metal parts of the caliper. If cleaner gets on the rubber, wipe it off quickly.
Mistake 4: Not Rinsing Thoroughly
Some people spray brake cleaner and let it dry without a final rinse. While brake cleaner evaporates, it can sometimes leave behind dissolved residue. For a truly clean finish, a final rinse with water (if safe for the cleaner) or a final spray of clean brake cleaner is best. This ensures no grime remains.
Mistake 5: Working on a Hot Braking System
Never try to clean brake calipers immediately after driving your car. The brake components will be extremely hot. This is a burn hazard. Hot surfaces also cause brake cleaner to evaporate too quickly, reducing its effectiveness. Always allow your car to cool down completely before starting any brake work. This might take an hour or more after a drive.
Mistake 6: Ignoring Other Brake Components
While cleaning calipers, it is easy to forget about other parts. Brake pads and rotors also accumulate dust and grime. If you only clean the caliper, your entire braking system might still look dirty or perform poorly. Take time to clean brake pads and inspect your rotors for rust. If you see rust, learn how to clean rust off brake rotors for a complete job. A holistic approach to brake cleaning yields the best results.
Avoiding these common mistakes ensures a safe, effective, and lasting clean for your brake calipers.
Restoring and Protecting Your Brake Calipers
Cleaning your brake calipers removes dirt and grime. But what if you want them to look brand new, or even better? Restoring and protecting your calipers involves a few extra steps. These steps can enhance their appearance and longevity. I believe a good cleaning job can be improved with some restoration work.
Painting Your Brake Calipers
After a deep clean, you might notice that the original paint on your calipers is chipped, faded, or completely gone. This is where high-temperature caliper paint comes in. Painting your calipers can dramatically improve their appearance. It also adds a layer of protection against corrosion and future brake dust adhesion.
Here is a brief guide for painting:
- Clean Thoroughly: Make sure calipers are absolutely spotless and dry. Any lingering dirt will show under the paint.
- Mask Off Areas: Use painter’s tape to mask off areas you do not want to paint. This includes brake lines, bleed nipples, and the piston area.
- Apply Primer (Optional): A high-temperature primer can improve paint adhesion and durability.
- Apply Paint: Use several thin coats of high-temperature caliper paint. Follow the manufacturer’s instructions for drying times between coats.
- Apply Clear Coat (Optional): A high-temperature clear coat adds shine and extra protection.
- Cure Time: Allow the paint to fully cure before reassembling. This can take 24 hours or more depending on the product and conditions.
High-temperature paints are designed to withstand the extreme heat generated by brakes. Do not use regular spray paint. Choose colors that complement your car’s look. Red, yellow, and black are popular choices.
Applying Protective Coatings
Once your calipers are clean and dry, or freshly painted, consider applying a protective coating. This adds a barrier that repels brake dust, dirt, and water. It makes future cleaning much easier.
- Wax/Sealant: For a quick protection, you can apply a car wax or synthetic sealant designed for wheels. These offer decent protection for a few weeks to a couple of months. Apply thinly and buff off.
- Ceramic Coating: For long-lasting protection, a high-temperature ceramic coating is the best choice. These coatings create a durable, slick, hydrophobic layer. They can last for a year or more. Application often involves wiping on the coating and then buffing it off after a short flash time. Ensure the caliper surface is perfectly clean before applying. Ceramic coatings make brake dust less likely to stick, and it often rinses off easily.
These extra steps make your brake calipers stand out. They also add a practical layer of protection. This reduces the frequency of deep cleaning. A well-restored and protected caliper looks fantastic.
Understanding Brake Dust and Its Impact
Brake dust is a common sight on wheels. It is the black or grey residue that accumulates on your wheels and brake components. But what exactly is it, and why does it matter? Understanding brake dust helps explain why cleaning brake calipers is important. It is more than just dirt; it is a byproduct of your car’s essential safety system.
Brake dust forms every time you use your brakes. When you press the brake pedal, the brake pads press against the brake rotors. This friction slows your car down. This friction also causes tiny particles to wear off both the brake pads and the rotors. These particles are what we call brake dust. The composition of brake dust depends on the material of your brake pads and rotors.
Most brake pads today are semi-metallic, ceramic, or organic.
- Semi-metallic pads often produce more visible brake dust. This dust usually contains tiny metal particles and friction material.
- Ceramic pads tend to produce less dust, and the dust they do produce is often lighter in color and less sticky.
- Organic pads vary in dust production.
The dust particles are very fine and airborne. They quickly settle on the nearest surfaces, which are your wheels and brake calipers.
Brake dust is not just ugly. It can be corrosive. The metallic content in brake dust, combined with moisture from rain or humidity, can cause pitting and corrosion on wheel finishes and caliper surfaces. This is especially true for clear-coated wheels. If left on surfaces for too long, brake dust can actually etch into the clear coat. This makes it very difficult to remove without professional intervention. This etching is a key reason why regular cleaning is important.
Additionally, brake dust acts as an insulator. When it coats your calipers, it can trap heat. This might contribute to higher brake temperatures, which can affect brake performance over time. While the effect might be minor for daily driving, in performance applications, any heat retention can be a disadvantage.
By cleaning brake calipers, you remove this corrosive, heat-trapping material. This helps maintain the appearance of your wheels. It also helps preserve the integrity and function of your brake system. Understanding the nature of brake dust reinforces the value of routine brake caliper cleaning. It is a small effort with big returns for your car’s health and look.
Frequently Asked Questions About Cleaning Brake Calipers
Q1: How often should I clean my brake calipers?
A1: The frequency depends on your driving habits and environment. For most drivers, cleaning calipers every 3-6 months is a good rule. If you drive in dusty conditions, experience heavy traffic, or notice significant brake dust accumulation, you might need to clean them more often, perhaps every 1-2 months. Regular car washes that include wheel cleaning can help maintain cleanliness between deeper cleans.
Q2: Is brake cleaner safe for all car finishes and components?
A2: Most modern brake cleaners are safe for painted surfaces, rubber, and plastic components when used as directed. However, always read the product label for specific warnings. Some aggressive cleaners can damage certain finishes or plastics. Avoid prolonged contact with painted surfaces. If in doubt, test the cleaner on an inconspicuous area first.
Q3: Can I clean brake calipers without removing the wheels?
A3: Yes, you can clean brake calipers without removing the wheels. This method offers less access but is suitable for routine maintenance or light cleaning. Turn the steering wheel to expose the front calipers. Use a long-handled wheel brush and brake cleaner to reach visible areas. It will improve appearance, but a full wheel removal offers the best access for a deep clean.
Q4: What causes brake calipers to get so dirty?
A4: Brake calipers get dirty primarily from brake dust. This dust is a byproduct of friction between brake pads and rotors during braking. Over time, this fine, often metallic, dust mixes with road grime, oil, and moisture, creating a sticky, corrosive layer. Heat from braking bakes this mixture onto the caliper surface, making it difficult to remove.
Q5: Will cleaning my brake calipers improve braking performance?
A5: Directly, cleaning calipers will not dramatically improve braking power. However, it helps maintain optimal performance indirectly. By removing corrosive brake dust and grime, you prevent issues like stuck pistons or increased heat retention. This ensures the calipers operate as designed, supporting consistent and reliable braking. It primarily prevents degradation of performance rather than boosting it.
Q6: Can I use household cleaners like dish soap or degreaser?
A6: While dish soap and general degreasers can remove some surface dirt, they are not ideal for brake calipers. They often leave residue and may not effectively dissolve stubborn brake dust. They are also not designed to evaporate quickly like brake cleaner. It is best to use a specialized brake cleaner. These products are formulated to safely and effectively clean brake components without leaving harmful residue.
Conclusion: Drive with Confidence and Clean Calipers
Cleaning brake calipers is more than just a cosmetic task; it is a vital part of automotive maintenance. We have explored the many benefits, from enhancing your vehicle’s appearance to ensuring the proper function and longevity of your braking system. I hope this guide gives you the confidence to tackle this job yourself. You now understand the importance of regular care for these critical components.
By gathering the right tools, following our step-by-step instructions, and avoiding common mistakes, you can achieve a professional-level clean. Whether you opt for a deep clean with wheel removal or a quick touch-up, consistent attention will keep your calipers looking their best and performing optimally. Remember that preventing buildup through regular washing and protective coatings saves time and effort in the long run.
Your car’s braking system is your primary safety feature. Keeping brake calipers clean contributes to its overall health and efficiency. So, grab your brake cleaner, put on your safety gear, and give your car the care it deserves. You will drive with greater confidence, knowing your brake calipers are in top condition. Take action today and experience the difference clean brake calipers make!
- brake caliper cleaning
- car brake maintenance
- brake dust removal
- vehicle cleaning tips
- DIY car care