· Car Care · 14 min read
How To Clean Foam Buffing Pads
Restore Your Shine: How To Clean Foam Buffing Pads
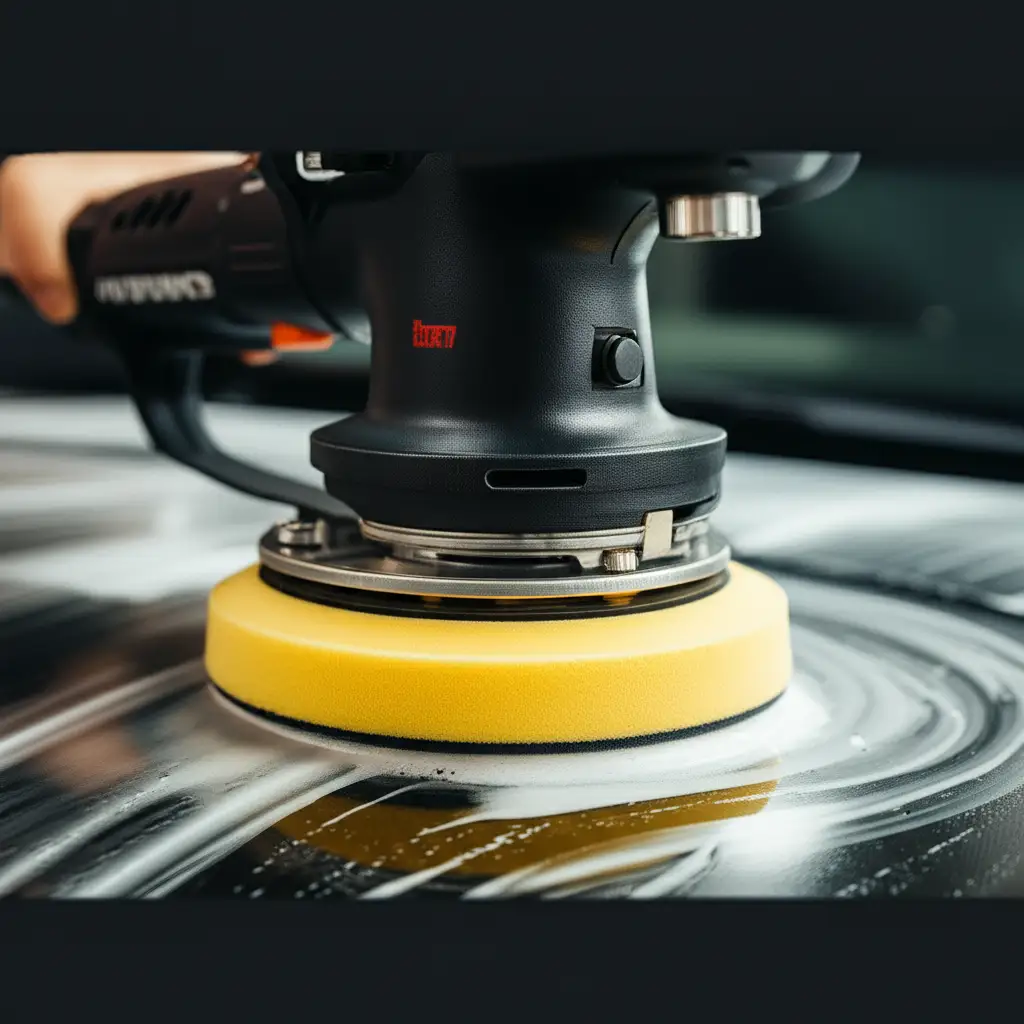
You love the deep shine your car gets after a good polish. Foam buffing pads are key tools for achieving this professional finish. These pads lift away imperfections and apply polish evenly. Yet, over time, old polish, compound, and dirt build up in them. This build-up makes your pads less effective. It can even scratch your car’s paint if left unchecked. Cleaning foam buffing pads is not just about keeping things tidy. It directly impacts your detailing results and the lifespan of your pads. Neglecting pad care means spending more money on replacements and getting poorer finishes.
I know the frustration of a pad that stops working as it should. A dirty pad can introduce swirls or haze into your paint. Proper cleaning brings your pads back to life. It ensures they perform at their best for every detailing job. This article will show you exactly how to clean foam buffing pads. We will cover hand washing methods and even machine washing tips. We will discuss drying techniques and proper storage. You will learn everything you need to maintain your pads.
Takeaway
Keeping your foam buffing pads clean is simple. It ensures better results and longer pad life.
- Always clean pads immediately after use.
- Use a dedicated pad cleaner or mild soap.
- Rinse pads thoroughly until the water runs clear.
- Dry pads completely to prevent mildew.
- Store pads in a clean, dust-free place.
Clear Answer
To clean foam buffing pads, rinse them immediately after use to remove compounds. For deeper cleaning, wash them by hand using warm water and a dedicated pad cleaner or mild soap, squeezing out contaminants. Alternatively, machine wash on a gentle cycle. Always dry pads completely and store them properly to maintain performance and extend their lifespan.
Why Cleaning Your Foam Buffing Pads Matters
Keeping your foam buffing pads clean is very important for car detailing. Many people do not realize how much dirty pads hurt their work. Clean pads help you get the best possible finish on your car. They also save you money by making your pads last longer.
When you use a buffing pad, it collects old polish, wax, and dirt. This material fills the small cells within the foam. A dirty pad cannot hold new product or cut effectively. Imagine trying to polish with a pad covered in old, hardened compound. It will not work well. It can even cause new scratches on your car’s paint. These scratches can be hard to remove. A pad full of old product loses its cushioning effect. This makes it harder to control and less effective at distributing pressure.
Regular cleaning removes these harmful contaminants. It restores the pad’s original texture and performance. A clean pad applies polish smoothly and consistently. It allows the polish to work as intended. This leads to a truly swirl-free, high-gloss finish. Think of your pads as sponges for your car’s surface. A clean sponge works best. It absorbs and releases liquid properly. Dirty pads simply cannot do their job right. Investing time in cleaning your pads extends their life. This means you do not have to buy new pads as often. This saves you money in the long run. It is a small effort with big rewards for your detailing work.
Essential Tools and Supplies for Cleaning Buffing Pads
Having the right tools makes cleaning your foam buffing pads much easier. You do not need many special items. Basic cleaning supplies often do the job. Some specialized products can make the process more efficient. I always keep these items ready for pad cleaning.
First, you will need a source of water. A bucket filled with warm water is often enough. For hand washing, a running tap works well. You also need a cleaning solution. Many detailers use a dedicated pad cleaner. These products break down polishing compounds and waxes effectively. You can also use a mild dish soap. Look for one that does not contain strong degreasers or harsh chemicals. These can damage the foam. I prefer something gentle that cleans without stripping the pad’s fibers. Just like how you might use mild soap for cleaning delicate items like reusable makeup pads, your buffing pads need similar care.
A pad brush or compressed air is also useful. A pad brush helps remove caked-on residue during the cleaning process. Compressed air helps blow out loose debris before washing. For drying, clean micro-fiber towels are excellent. They absorb water quickly from the pads. A pad spinner tool is an optional but helpful item. It uses centrifugal force to spin water out of the pads. This speeds up drying time significantly. Lastly, you might need rubber gloves. These protect your hands from chemicals and cleaning solutions. Having these simple tools ready ensures a smooth and effective cleaning process.
Pre-Cleaning Steps: Preparing Your Foam Pads
Preparation is key before you start the deep cleaning of your foam buffing pads. This initial stage helps remove loose debris. It also prevents dirt from spreading during washing. I always take a few moments for these quick steps. They make the main cleaning much easier.
First, remove excess polish or compound from the pad’s surface. You can do this immediately after use. Use a clean, dry micro-fiber towel. Simply wipe the pad surface. This removes any thick, gooey residue. This step prevents the compound from drying and hardening on the pad. Hardened compound is much tougher to remove later. Next, use a pad brush or compressed air. A pad brush helps dislodge embedded particles. Gently run the brush over the pad’s surface while it spins on your polisher. This throws off loose product. If you have an air compressor, a blast of compressed air works wonderfully. It helps blow out dust and dry compound from the foam’s pores. Think of it like cleaning a foam air filter. You want to remove as much loose material as possible before introducing water. This prevents creating a muddy mess.
If you plan to hand wash, having a dedicated bucket for pad cleaning is smart. This keeps your pads separate from other cleaning tasks. It also prevents cross-contamination. Fill this bucket with warm water. This water will help loosen up the remaining residue. Warm water softens dried-on product. It prepares the foam for a deeper wash. These preparation steps are quick. They significantly improve the efficiency of the main cleaning process. They set you up for success.
Manual Hand Washing Method for Buffing Pads
Hand washing is often the best way to clean foam buffing pads. It gives you full control over the cleaning process. This method is gentle on the pads. It helps extend their life. I prefer hand washing for delicate or heavily soiled pads. It allows me to focus on each pad individually.
Start with a clean bucket or a sink. Fill it with warm water. Add a small amount of pad cleaner or mild dish soap to the water. Do not use too much soap. Too much soap can be hard to rinse out of the foam. Submerge one pad at a time into the soapy water. Allow it to soak for a few minutes. This helps loosen dried-on polish and compounds. Gently agitate the pad with your fingers. Squeeze the pad repeatedly under the water. You will see colored water and residue come out. Keep squeezing and kneading the pad. Focus on areas with heavy build-up. You can use a soft brush if needed for stubborn spots. Be gentle. Avoid scrubbing too hard. This can damage the foam structure.
Once the pad looks clean, rinse it thoroughly under a running tap. Use warm water. Keep squeezing the pad. Continue rinsing until the water runs completely clear. This means all the soap and contaminants are gone. Any remaining soap can cause issues during your next detailing job. It can also dry out the foam over time. I am very particular about rinsing. It is just like rinsing soap from a memory foam pillow. You want no residue left behind. After rinsing, gently squeeze out as much excess water as possible. Do not twist or wring the pads aggressively. This can tear the foam. Just apply firm, even pressure. Now your pad is ready for drying.
Machine Washing Foam Buffing Pads
Machine washing can be a convenient option for cleaning multiple foam buffing pads. This method saves time. It is important to do it correctly to avoid damaging your pads. I use machine washing for pads that are not extremely dirty. It works well for general maintenance.
Before placing pads in the washing machine, perform the pre-cleaning steps. Remove any large chunks of dried compound. You can do this with a pad brush or compressed air. Place the pads inside a mesh laundry bag. This bag protects the pads from tears. It also prevents them from getting stuck in the machine’s moving parts. Do not wash your pads with other laundry. Polishing residue can transfer to clothes. The lint from clothes can also stick to your pads. Just like with cleaning Shark steam mop pads separately, keep your buffing pads isolated.
Set your washing machine to a gentle cycle. Use cold or warm water, not hot. Hot water can degrade the foam’s adhesive. This can cause the pad to separate from its backing. Add a small amount of a mild liquid detergent. Avoid powdered detergents. They can leave residue in the foam. Do not use fabric softeners or bleach. Fabric softeners can clog the foam’s pores. Bleach can damage the foam. After the wash cycle, immediately remove the pads from the machine. Squeeze out excess water gently. Do not put them in the dryer. The heat from a dryer will ruin your foam pads. They need to air dry completely.
Proper Drying Techniques for Foam Pads
Proper drying is one of the most critical steps after cleaning your foam buffing pads. If pads are not dried completely, they can develop mildew. Mildew smells bad and can damage the foam. It also makes the pads unsafe to use on your car. Damp pads can also hold moisture. This moisture can mix with your polish during use. This leads to poor results. I always make sure my pads are bone dry before storing them.
After washing, squeeze out as much water as you can by hand. Do this gently. Do not twist or wring the pad. Just apply firm, even pressure to remove the bulk of the water. If you have a pad spinner, this is the perfect time to use it. A pad spinner attaches to your drill. It spins the pad at high speeds. This centrifugal force quickly forces water out of the foam. It significantly speeds up drying time. Using a pad spinner makes the drying process much faster and more efficient. It is a great investment if you clean many pads regularly. You want to get the pad damp, not dripping wet.
Once most water is removed, place the pads in a clean, well-ventilated area. Lay them flat on a clean micro-fiber towel. You can also hang them if they have a hanging loop. Do not leave them in direct sunlight. Excessive heat can damage the foam. Avoid drying them near heat sources like radiators. Air circulation is very important. You can use a fan to help circulate air. This speeds up the drying process. Allow the pads to dry completely. This can take anywhere from 12 to 24 hours, depending on humidity and air flow. Feel them thoroughly. If they feel even slightly damp, let them dry longer. Using them wet or storing them wet will cause problems.
Storing Your Clean Buffing Pads
Proper storage of your clean foam buffing pads is just as important as cleaning them. Storing pads correctly protects them from dust and damage. It also keeps them ready for your next detailing project. Neglecting storage can shorten their lifespan. It can also contaminate them. I have seen many pads ruined by poor storage.
Once your pads are completely dry, they are ready for storage. Never store damp pads. Damp pads will quickly grow mildew. This makes them unusable. Place your clean, dry pads in an airtight container or a clean plastic bag. Clear storage containers work well. They allow you to see what pads you have. This also prevents dust and other contaminants from settling on them. Dust can scratch your car’s paint during your next detailing session. It is like how you store other foam items, like the foam from a VR headset, keeping them clean and protected is key.
Store your containers in a cool, dry place. Avoid areas with extreme temperatures. Heat can degrade the foam over time. Cold can make the foam brittle. A garage shelf or a cabinet works well. Keep them away from direct sunlight. Sunlight can cause the foam to break down or discolor. You can also organize your pads by type or size. This makes it easy to grab the right pad for the job. Labeling containers helps with organization. Proper storage ensures your pads remain in top condition. They will be clean, soft, and ready for action whenever you need them. This small effort helps you achieve excellent results consistently.
Frequently Asked Questions
How often should I clean my foam buffing pads?
You should clean your foam buffing pads after every use. Polish and compound residue hardens quickly. Cleaning pads immediately prevents this build-up. This keeps the pads soft and effective. Regular cleaning also helps maintain pad performance. It extends their overall lifespan.
Can I use regular laundry detergent to wash buffing pads?
Avoid regular laundry detergents. Many contain harsh chemicals, dyes, or fabric softeners. These ingredients can damage the foam. They can also leave residue that harms your paint. Use a mild liquid dish soap or a dedicated pad cleaner. These options are safer for foam.
What if my pad is stained after cleaning?
Staining is common with certain polishes or compounds. A stained pad is still clean if you followed the cleaning steps. Color changes do not mean the pad is dirty. As long as the pad is free of residue and soft, it is ready to use. Focus on cleanliness, not just appearance.
How long do foam buffing pads last?
The lifespan of foam buffing pads varies. It depends on usage, cleaning frequency, and proper care. With proper cleaning and storage, a pad can last for many detailing sessions. Poor care shortens their life significantly. Inspect pads regularly for tears or breakdown.
Can I dry foam pads in a clothes dryer?
No, never dry foam buffing pads in a clothes dryer. The high heat from a dryer will damage the foam. It can melt or deform the pad. It can also cause the adhesive to fail. Always air dry your foam pads. Use a pad spinner or simply let them air dry in a well-ventilated area.
What is a pad conditioner, and do I need it?
A pad conditioner is a spray that primes a new or clean pad. It lubricates the foam. This prevents the pad from absorbing too much product initially. It helps the polish spread evenly. It can be useful for extending product working time. It is not strictly necessary for every detailing job.
Conclusion
Cleaning your foam buffing pads is a vital part of car detailing. It might seem like a small task. Yet, it greatly impacts your results and your pads’ longevity. We talked about why clean pads are essential. We covered the tools you need. We walked through pre-cleaning, hand washing, and machine washing. We also discussed proper drying and storage. Each step helps your pads perform their best.
My goal is to help you achieve a perfect finish every time. Clean foam buffing pads are key to this. They ensure your polishes and compounds work as intended. They prevent swirls and scratches. They also save you money by extending pad life. Make pad cleaning a routine habit after every detailing session. You will see a clear difference in your work. So, next time you finish polishing, take a few minutes to care for your pads. Your car’s paint will thank you, and your wallet will too. Start cleaning your pads today and enjoy superior results.
- foam buffing pads
- car detailing
- pad cleaning
- automotive care
- polishing pads
- buffing pad maintenance