· Home Maintenance · 17 min read
How To Clean Your Dryer Vent From Outside With A Drill
How to Clean Your Dryer Vent From Outside With a Drill
I often think about important home maintenance tasks. Cleaning your dryer vent is a critical one. It is a key step for home safety and appliance efficiency. A clogged dryer vent causes fire hazards and wastes energy. This guide shows you how to clean your dryer vent from outside with a drill. We will cover tools, safety, and step-by-step instructions. You will learn to perform this important task effectively. This method ensures thorough lint removal and improves your dryer’s performance.
Takeaway
- Cleaning your dryer vent from outside is simple with the right tools.
- A drill-powered brush system makes lint removal easy and effective.
- Regular dryer vent cleaning prevents fires and improves dryer efficiency.
- This outside approach minimizes indoor mess and provides access to the full vent length.
Clear Answer
Cleaning your dryer vent from outside with a drill involves attaching a specialized brush to a drill, then feeding it into the vent pipe from the exterior opening. This method effectively removes lint buildup, improving dryer performance, reducing fire risks, and often providing better access to the entire vent line.
The Importance of a Clean Dryer Vent: Safety and Efficiency
Your dryer works hard to dry clothes. It pushes out hot, moist air. This air carries lint from your clothes. Lint often escapes the lint trap inside your dryer. It then travels into the dryer vent duct. Over time, this lint builds up. It sticks to the walls of the vent pipe. This buildup is a major concern for homeowners.
A clogged dryer vent poses a serious fire hazard. Lint is highly flammable. The hot air from the dryer can ignite this lint. This leads to dangerous house fires. Fire departments respond to thousands of dryer fires each year. Most of these fires start because of clogged vents. Cleaning your vent protects your home and family. It is a simple step to prevent a disaster.
Beyond fire safety, a clean dryer vent improves efficiency. When lint blocks the vent, air cannot flow freely. Your dryer must work harder to push air out. This makes drying cycles longer. It uses more electricity or gas. Your energy bills go up. Clothes might still feel damp after a cycle. A clean vent allows proper airflow. This makes your dryer run efficiently. It saves you money on utility costs. Your clothes dry faster and better. Regular cleaning is a smart investment in your home.
Think about how much you use your dryer. Each load adds more lint to the vent. A small amount of lint might not seem like much. But it accumulates quickly. This gradual buildup can become a thick layer. It can completely block the vent. This significantly increases risks. Proper maintenance keeps your appliance running smoothly. It extends its lifespan. A well-maintained dryer performs better for longer.
Understanding the Benefits of Cleaning from the Outside
Cleaning a dryer vent can be done from inside or outside. Many people prefer the outside method. This approach offers several advantages. It often provides better access to the full length of the vent. Dryer vents can be long. They might have bends and turns. The outside access point is usually the last point of discharge. This allows you to push the brush through the entire length of the vent. You can reach clogs that are far down the line. This ensures a more complete cleaning.
One major benefit is less mess inside your home. When you clean from the inside, lint often escapes. It can spread dust and debris throughout your laundry room. Cleaning from the outside keeps all the mess contained. The lint comes out directly outside. This saves you cleanup time later. It keeps your indoor air cleaner during the process.
The outside method is also practical for certain dryer setups. Some dryers are against an outside wall. Their vents go straight through the wall. Cleaning from the outside is very direct in these cases. It might be easier than moving a heavy dryer. Moving a dryer can scratch floors. It can also disconnect hoses. Cleaning from the outside avoids these issues. You simply work from the exterior of your house.
This method also helps you inspect the vent cap. The vent cap is on the outside wall. It has flaps that open when the dryer runs. These flaps keep pests out. They also prevent cold air from entering. Lint can build up on these flaps. It can make them stick. A stuck flap reduces airflow. Cleaning from the outside allows you to clear the cap directly. You can ensure the flaps open and close properly. This maintains optimal vent function.
Using a drill with an extendable brush system is very effective. The drill spins the brush. This spinning action scrapes lint from the vent walls. It pushes the lint out. The flexible rods allow you to reach far. This combination makes quick work of tough clogs. It makes the job easier and more thorough. The outside method simplifies this process.
Gathering Your Essential Tools: What You Need for the Job
Before you start cleaning, you need the right tools. Having everything ready makes the job smoother. You do not want to stop in the middle of cleaning. Gather your items beforehand. This ensures a safe and effective cleaning process.
The Right Drill for the Job
You will need a drill. A cordless drill is best for this job. It offers flexibility. You can move freely around the outside of your house. There is no cord to trip over. A drill with adjustable speed settings is also helpful. You want to start at a low speed. This prevents damage to the vent. You can increase speed if needed. Ensure your drill has a fully charged battery. A drill with good torque works well. It handles resistance from lint buildup. Most standard household drills are suitable.
Specialized Dryer Vent Cleaning Kits
The most important tool is a dryer vent cleaning kit. These kits are specific for this task. They typically include several items. You will find flexible rods. These rods connect to each other. This allows you to extend the reach of your brush. Kits also include a brush head. This brush head attaches to the rods. The brush is usually made of nylon or stiff plastic bristles. It is designed to fit inside standard vent pipes. Some kits also come with a drill attachment. This attachment connects the first rod to your drill. Make sure the kit matches your vent size. Most residential dryer vents are 4 inches in diameter. Check your dryer’s manual if unsure.
Personal Safety Gear
Safety is always first. You need personal protective equipment. Wear work gloves. These protect your hands from dirt and sharp edges. Lint can be dusty. It can also irritate your eyes. So, wear safety glasses or goggles. A dust mask or respirator is also important. This prevents you from inhaling lint particles. Lint can carry mold spores or other irritants. A mask keeps your lungs safe. Wear old clothes. Cleaning a dryer vent can be a dirty job. You do not want to ruin your good clothes. Dress comfortably and prepare to get a little dirty. These items ensure your comfort and safety during the task.
Preparing for Action: Crucial Safety Steps Before You Begin
Safety is paramount when working with appliances. Always take precautions before starting any DIY project. Cleaning your dryer vent is no exception. Proper preparation prevents accidents. It ensures a smooth and safe process. Follow these steps carefully.
First and most important, disconnect your dryer from its power source. If it is an electric dryer, unplug it from the wall outlet. This prevents the dryer from accidentally turning on. It removes the risk of electric shock. For gas dryers, you must turn off the gas supply. Locate the gas shut-off valve behind the dryer. Turn the valve to the “off” position. This stops gas flow to the appliance. Gas dryers have both electric and gas connections. You must handle both. Never work on a dryer without cutting its power. This step is non-negotiable for your safety.
Next, make sure the area around the exterior vent cap is clear. Remove any obstacles. Move garden furniture, plants, or decor. You need enough space to work comfortably. Good access helps you maneuver the cleaning tools. It reduces the chance of tripping or falling. A clear workspace is a safe workspace.
Check the weather conditions. Avoid cleaning on a rainy or very windy day. Rain can make surfaces slippery. This increases the risk of falls. Strong winds can blow lint back at you. It can also make handling long rods difficult. Choose a dry, calm day for this task. This ensures better visibility and easier working conditions.
Inform family members that you are working on the dryer. Tell them not to use it. This prevents anyone from trying to turn it on while you are working. Communication is key in household safety. A simple heads-up can prevent misunderstandings.
Lastly, prepare your tools near the outdoor vent opening. Lay out your drill, vent cleaning kit rods, and brush head. Have your safety glasses, gloves, and mask ready. This organization saves time. It ensures you have everything within reach. Proper preparation makes the cleaning process efficient and safe. You will be ready to begin once these steps are complete.
Step-by-Step Guide: Cleaning Your Dryer Vent with a Drill
Now it is time to clean the dryer vent. This process is straightforward. Follow these steps for effective lint removal. Take your time and work carefully. You will be surprised how much lint comes out.
Locating and Accessing the Vent Cap
Your dryer vent exits your home through a vent cap. This cap is usually on an exterior wall. It can be on the side or back of your house. Look for a small plastic or metal cover. It often has flaps or a screen. This is where the lint blows out. Once you locate it, you need to access it. You might need a ladder if it is high up. Ensure the ladder is stable. Position it securely on level ground. Open or remove the vent cap. Many caps have small clips or screws. Some might just pull open. Clear any visible lint or debris from around the opening. This gives you a clean starting point.
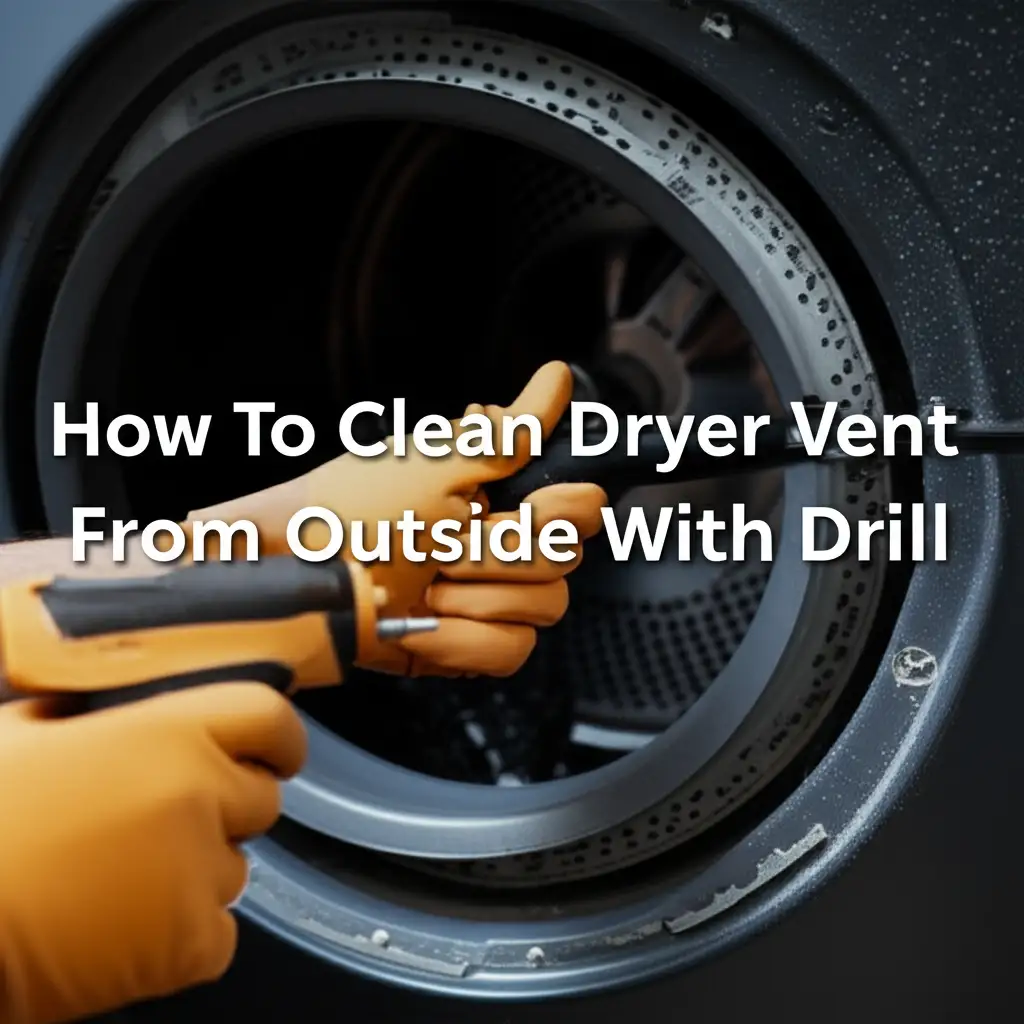
Assembling Your Drill-Powered Brush System
Take your dryer vent cleaning kit. Attach the brush head to one of the flexible rods. Make sure it screws on tightly. Next, attach the drill attachment to the other end of that rod. Secure it firmly. Then, insert the drill attachment into your drill chuck. Tighten the chuck firmly. The brush must not slip when the drill spins. Now, you have your basic cleaning tool. You will add more rods as you go deeper into the vent. Each rod connects to the previous one. This extends the reach of your brush. Make sure each connection is secure.
The Cleaning Process: Gentle and Thorough
Begin by inserting the brush head into the vent opening. Push it in slowly. Start with your drill on a low speed setting. This prevents the brush from whipping around too fast. It also reduces the chance of damaging the vent pipe. As you push the brush in, gently engage the drill. Let the brush spin. The spinning action will loosen lint from the vent walls. Slowly feed more rods into the vent. Add new rods as the brush disappears inside. Push and pull the brush slightly as it spins. This helps dislodge stubborn lint. You will see lint emerging from the vent opening. Continue this process until you feel the brush has reached the end of the vent. This is typically when you feel resistance from the dryer itself. Do not force the brush. If it gets stuck, pull it back slightly. Then, try again. The goal is to clear the entire path.
Post-Cleaning Checks and Reassembly
Once you have pushed the brush through the entire vent length, slowly pull it back out. As you retract the rods, lint will continue to emerge. Disconnect the rods one by one. Clean off the lint from the brush and rods. You might be surprised by the amount of lint you remove. Once all rods are out, give the vent opening one last wipe. Make sure no lint remains around the cap area. Reattach the vent cap firmly. Ensure its flaps move freely. Go back inside your home. Reconnect your dryer to its power source. For gas dryers, turn the gas supply back on. Run your dryer on an air-only cycle for a few minutes. This helps clear any remaining loose lint. It also checks for proper airflow. You should feel strong air coming from the outside vent.
Recognizing a Clogged Vent: Signs It’s Time to Clean
Your dryer often tells you when it needs attention. Recognizing the signs of a clogged vent is important. Ignoring these warnings can lead to problems. Pay attention to how your dryer performs. These indicators suggest lint buildup is occurring. Knowing these signs helps you schedule cleaning. It protects your home before issues escalate.
One clear sign is longer drying times. If your clothes take more than one cycle to dry, your vent might be clogged. The dryer cannot push out moist air efficiently. This traps moisture inside. It makes drying take much longer. A single load that used to take 45 minutes now takes 90 minutes. This is a strong indicator.
Clothes feel hotter than usual. After a drying cycle, your clothes should be warm. If they feel extremely hot to the touch, it is a warning. This means heat is trapped inside the dryer. It cannot escape through the vent. The lint acts as an insulator. This trapped heat can damage clothes. It can also overheat the dryer itself.
The dryer’s exterior also feels very hot. Touch the top or sides of your dryer during operation. If it feels excessively hot, heat is not venting properly. The dryer is working harder. It is trying to push air out. This trapped heat can lead to component failure. It increases fire risk.
You might notice a burning smell. This is often a smell of burning lint. The lint stuck in the vent or around the heating element gets hot. It can scorch. This smell is a serious warning sign. If you smell burning, stop the dryer immediately. Unplug it and check the vent. Do not use it again until the issue is fixed.
Another sign is excessive lint on clothes. After a cycle, you might see lint on your freshly dried items. This happens because the lint cannot exit the vent. It gets recirculated back into the drum. Your lint trap might also fill up faster than usual. It might seem like there is more lint than normal. This means the system is not effectively removing lint. These signs tell you it is time for a thorough vent cleaning. Do not wait until a problem becomes severe.
Maintaining Your Dryer Vent: Prevention and Best Practices
Cleaning your dryer vent is not a one-time job. Regular maintenance is key. It keeps your dryer running safely and efficiently. It also extends the life of your appliance. Simple habits can prevent major clogs. Incorporate these best practices into your routine. They save you time and money in the long run.
First, establish a cleaning schedule. Most experts recommend cleaning your dryer vent at least once a year. If you use your dryer heavily, clean it more often. Large families or homes with pets might need cleaning every six months. Pet hair creates a lot of lint. Pay attention to the signs of a clogged vent. If you notice any, clean it sooner. Do not wait for a full year if performance drops.
Always clean your dryer’s lint screen before every load. This is a simple but crucial step. A full lint screen restricts airflow inside the dryer. It forces more lint into the vent. Remove the lint and discard it properly. Some people use a small vacuum attachment to clean the lint trap housing. This removes smaller lint particles that bypass the screen.
Inspect your exterior vent cap regularly. At least once every few months, check the outdoor vent opening. Make sure the flaps open and close freely. Remove any visible lint buildup around the cap. Clear away any nesting materials from birds or small animals. Pests sometimes build nests inside vent caps. This can completely block airflow. A quick visual check can prevent serious issues.
Consider the type of dryer vent duct you have. Smooth metal ducts are best. They offer less resistance to airflow. Lint does not stick as easily to smooth surfaces. Flexible foil or plastic ducts are more prone to lint buildup. They have ridges and can easily kink. If you have these, consider replacing them with rigid metal ducts. This improves airflow and reduces lint accumulation.
Avoid overloading your dryer. Putting too many clothes in a single load restricts airflow. It makes the dryer work harder. This also generates more lint. Dry smaller loads. This allows clothes to tumble freely. It helps the dryer perform at its best.
Finally, keep the area around your dryer clear. Ensure there is enough space for proper ventilation. Do not push the dryer too close to the wall. This can kink the vent hose behind it. A kinked hose restricts airflow significantly. Proper spacing allows for good air circulation. Following these simple steps will keep your dryer vent clear. It will help your dryer operate safely and efficiently for years to come.
FAQ Section
How often should I clean my dryer vent?
You should clean your dryer vent at least once a year. If you use your dryer frequently, or if you have pets, consider cleaning it every six months. Pay attention to signs like longer drying times, as these indicate a need for immediate cleaning.
Can I clean the dryer vent from inside instead?
Yes, you can clean the dryer vent from the inside. This often requires pulling the dryer away from the wall to access the vent connection. However, cleaning from the outside using a drill allows you to push lint out of the house, minimizing indoor mess and often reaching the entire vent length more easily.
What happens if I do not clean my dryer vent?
If you do not clean your dryer vent, lint buildup will restrict airflow. This causes your dryer to take longer to dry clothes and increases energy consumption. More seriously, accumulated lint is highly flammable and poses a significant fire hazard. It can also damage your dryer.
Is a drill necessary for cleaning the dryer vent?
A drill is not strictly necessary, but it makes the job much easier and more effective. A specialized drill-powered brush kit allows the brush to spin rapidly, scraping lint off the vent walls far more efficiently than a manual brush. This ensures a more thorough cleaning.
What kind of drill should I use?
A cordless drill with adjustable speed settings is ideal. A standard household drill with sufficient torque will work well. Ensure the battery is fully charged. The adjustable speed lets you start slow and increase as needed, preventing damage to the vent pipe during cleaning.
What are the main benefits of a clean dryer vent?
A clean dryer vent offers three main benefits: greatly reduced fire risk, improved dryer efficiency leading to lower energy bills, and faster drying times for your clothes. It also extends the lifespan of your dryer by preventing it from overheating.
Conclusion
Cleaning your dryer vent from outside with a drill is an essential home maintenance task. It directly impacts your home’s safety and your dryer’s performance. You have learned the importance of lint removal and how to gather the right tools. We covered critical safety steps to ensure a smooth process. The step-by-step guide showed you how to clean your dryer vent effectively.
Remember the signs of a clogged vent, such as longer drying times or hot clothes. Regular maintenance, including cleaning the lint trap before every load, prevents future buildup. Taking these simple steps protects your home from fire hazards. It also saves you money on energy bills and extends your dryer’s life. Make dryer vent cleaning a regular part of your home care routine. Your family and your wallet will thank you.
- dryer vent cleaning
- home safety
- lint removal
- drill brush
- DIY home maintenance
- energy efficiency