· Automotive Maintenance · 14 min read
How To Clean Brake Pads
How to Clean Brake Pads for Optimal Performance
Are your car’s brakes making a strange noise? Perhaps you hear a squeal or grind every time you press the pedal. Or maybe you notice a thick layer of black dust on your wheels. These are common signs that your brake pads need attention. Learning how to clean brake pads is a simple car maintenance task. It significantly improves your vehicle’s safety and performance. This guide will walk you through everything you need to know. We will cover why cleaning matters, what tools you need, and step-by-step methods to get the job done right.
Takeaway
- Safety First: Always wear safety gear and let brakes cool before cleaning.
- Identify Issues: Clean brake pads when you hear squealing or see heavy dust.
- Choose Method: Decide between cleaning with wheels on or deep cleaning with wheels off.
- Use Right Products: Always use dedicated brake cleaner. Avoid harsh chemicals.
- Inspect Components: Check pads and rotors for wear during cleaning.
Main Query Answer
You can clean brake pads by removing brake dust and grime. Use a suitable brake cleaner spray and a brush. This process helps reduce noise, improves braking efficiency, and extends the life of your brake system components. Always follow safety steps.
Why Cleaning Brake Pads Matters
Your car’s brake pads are essential for stopping. They press against the brake rotors to slow down your vehicle. Over time, brake pads wear down and create fine dust. This dust, combined with road grime, builds up on the pads and surrounding components. This buildup causes several problems. Regular cleaning maintains brake efficiency and your safety.
Enhanced Safety and Performance
Dirty brake pads cannot grip the rotors as effectively. This reduces your car’s stopping power. It means you need more distance to stop, especially in emergencies. Cleaning brake pads removes this obstructive layer. Your brakes respond better. This improves overall vehicle safety. You feel more confident on the road.
Extended Component Lifespan
Brake dust is abrasive. It causes premature wear on your brake pads and rotors. When dust builds up, it acts like sandpaper. This increases friction and heat. Cleaning away this dust reduces wear and tear. It helps your brake pads and rotors last longer. This saves you money on replacements.
Reducing Annoying Noise
One of the most common signs of dirty brake pads is noise. Squealing or grinding sounds often come from brake dust accumulation. This dust can vibrate between the pad and rotor. It creates high-pitched noises. Cleaning the pads removes this source of noise. It gives you a quieter, smoother braking experience.
Identifying When Your Brake Pads Need Cleaning
Knowing when to clean your brake pads is key. Your car often gives clear signals. Paying attention to these signs helps you prevent bigger problems. It ensures your braking system stays in top condition. Ignoring these signs can lead to reduced performance and safety risks.
Squealing or Grinding Noises
A common indicator of dirty brake pads is noise. You might hear a high-pitched squeal when you press the brake pedal. This often means brake dust or small debris is trapped between the pad and rotor. If the sound is a low grind, it could be a sign of worn-out pads. It might also mean metal-on-metal contact. Before assuming worn pads, try cleaning them. It often solves the squealing issue.
Visible Brake Dust Buildup
Look at your wheels, especially the front ones. Do you see a thick layer of dark, powdery dust? This is brake dust. It comes from the friction material of your pads. A lot of visible dust means it has built up on your brake components. This buildup can affect performance. It can also be unsightly. Cleaning the pads helps remove this accumulation.
Reduced Braking Effectiveness
Does your car feel like it takes longer to stop? Or do you need to press the brake pedal harder than usual? These are signs of reduced braking effectiveness. Dirty brake pads cannot grip the rotor properly. This makes your brakes feel spongy or less responsive. Cleaning the pads can restore their grip. This brings back normal stopping power. This is a crucial safety check.
Essential Tools and Materials for Brake Pad Cleaning
Before you start cleaning, gather all your supplies. Having everything ready makes the job easier and safer. Using the correct tools and materials is very important. It prevents damage to your brake system. It also ensures an effective cleaning process.
Safety Gear
Safety must come first. Brake dust can contain harmful metallic particles and asbestos-like fibers. Always protect yourself.
- Safety Glasses: Protect your eyes from flying dust or spray.
- Dust Mask or Respirator: Prevents you from inhaling harmful brake dust.
- Gloves: Protect your hands from dirt, grime, and harsh chemicals. Disposable nitrile gloves work well.
Cleaning Agents
Choose cleaning products specifically designed for brakes. Do not use general household cleaners.
- Brake Cleaner Spray: This is a specialized solvent. It dissolves grease, oil, and brake dust without leaving residue. It evaporates quickly.
- Brake Dust Brush: A stiff-bristled brush helps dislodge stubborn dust.
- Clean Rags or Microfiber Towels: For wiping down surfaces and catching drips.
- Bucket of Water (optional): For rinsing if using soap, but brake cleaner usually doesn’t need rinsing.
Workshop Tools
You will need some basic automotive tools if you remove the wheels.
- Jack and Jack Stands: Essential for safely lifting and supporting your vehicle. Never work under a car supported only by a jack.
- Lug Wrench: To remove and re-install your wheel nuts.
- Wheel Chocks: Place these behind the wheels that stay on the ground. This prevents the car from rolling.
- Torque Wrench: Important for tightening lug nuts to the correct specification. This prevents wheels from coming loose.
- Wire Brush (Optional): For cleaning rust or heavier buildup on calipers or rotors. Remember, you might need to clean rust off brake rotors. For more information, read our guide on how to clean rust off brake rotors.
Step-by-Step Guide: Cleaning Brake Pads with the Wheels On
Cleaning your brake pads without removing the wheels is a quick method. It is great for light maintenance or routine dust removal. This method is less invasive. It requires fewer tools. It primarily targets visible brake dust and surface grime. This can often resolve minor squealing issues.
Preparation and Safety First
- Park on a Level Surface: Choose a flat, stable area. Engage your parking brake fully.
- Let Brakes Cool: Never clean hot brakes. Drive for a short distance or let the car sit for at least an hour. Hot brakes can cause the cleaner to evaporate too fast or even ignite.
- Put on Safety Gear: Wear your safety glasses, dust mask, and gloves. Brake dust is harmful.
- Protect Your Wheels: Place old towels or plastic sheeting around the brake area. This protects your wheel rims from brake cleaner overspray.
- Turn Your Wheels: For front brakes, turn the steering wheel all the way to one side. This exposes more of the brake caliper and pad area. Repeat for the other side.
Targeted Cleaning Approach
- Initial Spray: Generously spray the brake cleaner directly onto the brake pads. Also spray the caliper and visible rotor surfaces. Focus on areas with heavy brake dust buildup. The cleaner will quickly dissolve grease and grime.
- Brush Away Dust: Use your brake dust brush to agitate the dust. Brush around the pads and caliper. Get into the crevices where dust collects. You can also clean brake rotors without removing wheels, which is similar to this method. To learn more, check out how to clean brake rotors without removing wheel.
- Second Spray and Wipe: Spray again to rinse away the dislodged dust. Let the excess cleaner drip off. It evaporates quickly. Wipe any residue from your wheels with a clean rag.
- Repeat for All Wheels: Move to each wheel and repeat the process. Ensure you clean all brake pads.
- Test Brakes: Once finished, pump your brake pedal a few times before driving. This rebuilds brake pressure. Drive slowly at first. Test your brakes in a safe area. This confirms they are working correctly.
Step-by-Step Guide: Deep Cleaning Brake Pads (Wheel Removal)
For a thorough cleaning, removing the wheels is the best approach. This allows you to inspect and clean the brake pads, calipers, and rotors more completely. This method is recommended for persistent squealing or heavy contamination. It provides better access to all components.
Lifting and Securing Your Vehicle
- Park and Engage Brake: Park your car on a level, firm surface. Engage the parking brake.
- Loosen Lug Nuts: Use your lug wrench to slightly loosen the lug nuts on the wheel you are working on. Do not remove them yet.
- Jack Up Car: Place your jack under the vehicle’s frame, near the wheel. Raise the car until the wheel is off the ground.
- Place Jack Stands: Position jack stands securely under the vehicle’s frame. Lower the car onto the stands. Never rely solely on the jack.
- Remove Wheel: Finish unscrewing the lug nuts and carefully remove the wheel. Place it aside.
- Wheel Chocks: Place wheel chocks on the opposite side’s wheels. This adds an extra layer of safety.
Accessing Brake Components
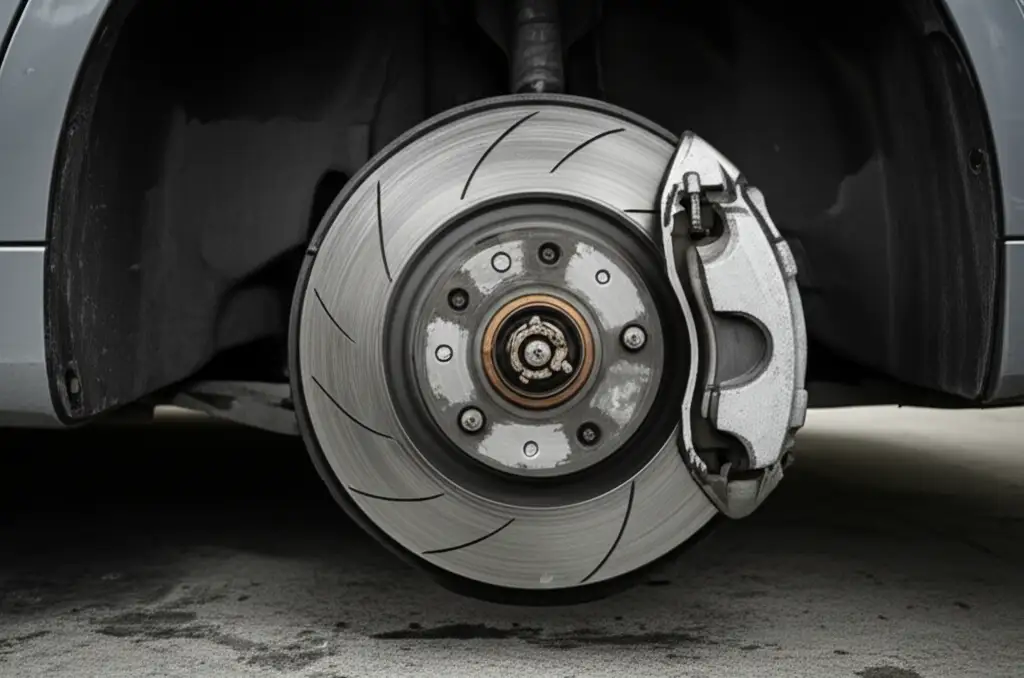
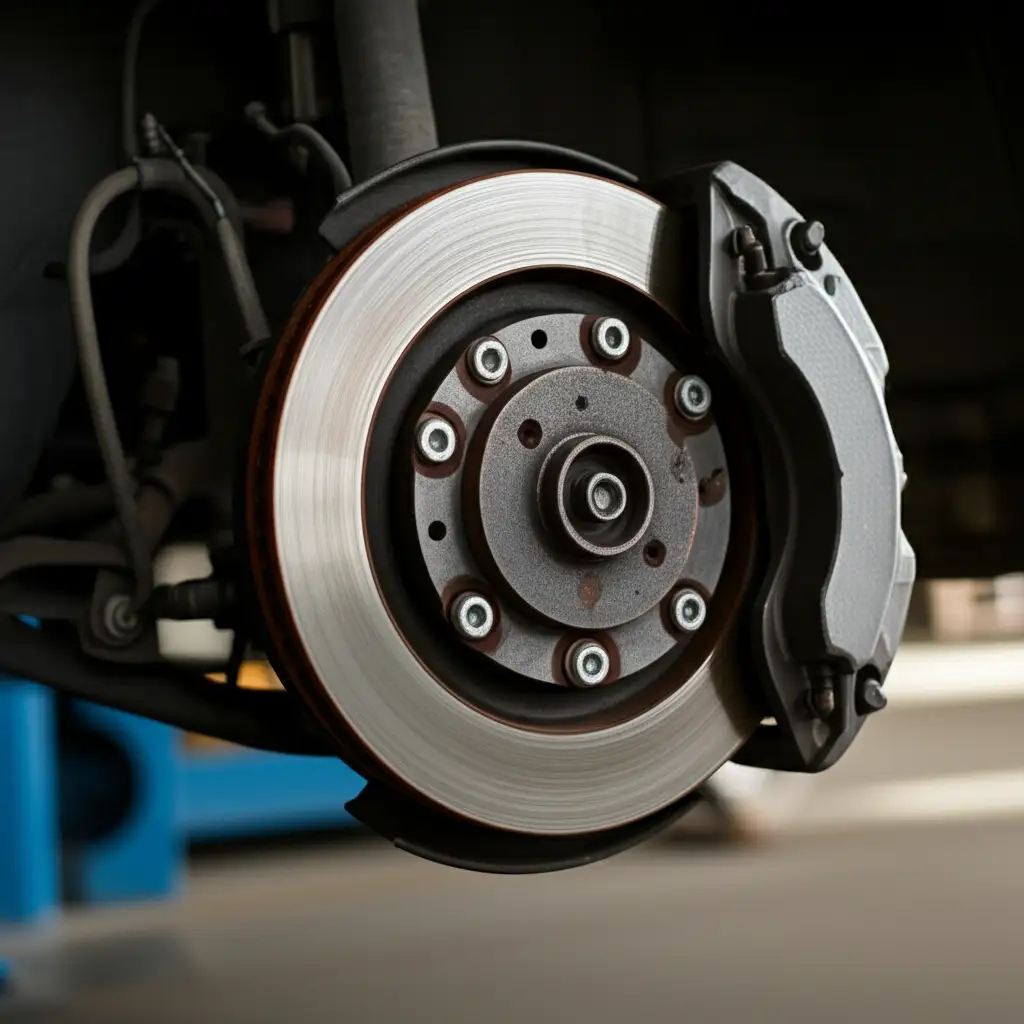
- Identify Components: With the wheel off, you can clearly see the brake caliper, brake pads, and rotor. The brake pads sit inside the caliper, pressing against the rotor.
- Inspect for Wear: Before cleaning, quickly inspect the brake pads and rotor. Look for uneven wear, deep grooves on the rotor, or very thin pads. If pads are too thin (less than 3-4mm), they need replacement, not just cleaning. If you see rust on your rotors, cleaning brake pads will help, but addressing the rotor rust is also important. For tips on this, refer to our guide on how to clean rust off brake rotors.
Cleaning Brake Pads and Calipers
- Spray Brake Cleaner: Generously spray brake cleaner onto the brake pads. Also spray the caliper and visible parts of the rotor. Let it soak for a moment.
- Brush Away Dirt: Use your brake dust brush or a stiff wire brush. Scrub the brake pads, especially the edges and backing plates. Clean the caliper housing. Remove all visible brake dust, grime, and any light rust.
- Wipe Down: Use a clean rag to wipe off any residue. The brake cleaner evaporates quickly. Ensure no dirty liquid remains.
- Repeat for Other Side: Move to the next wheel and repeat the entire process. Work on one wheel at a time for safety.
Reassembly and Final Steps
- Reinstall Wheel: Place the wheel back onto the wheel studs. Hand-tighten the lug nuts.
- Lower Vehicle: Carefully raise the car slightly with the jack. Remove the jack stands. Slowly lower the vehicle until the wheel touches the ground but not fully weighted.
- Torque Lug Nuts: Use your torque wrench to tighten the lug nuts to your car’s specified torque settings. This is crucial for safety. Check your car’s manual for the correct torque.
- Fully Lower Car: Lower the car completely. Remove the jack and chocks.
- Pump Brakes and Test: Before driving, pump your brake pedal several times until it feels firm. This resets the caliper pistons. Drive slowly at first in a safe area. Test the brakes gently. Listen for any unusual noises or feel for any issues.
Common Mistakes to Avoid When Cleaning Brake Pads
Cleaning your brake pads can significantly improve performance. However, making certain mistakes can harm your brake system or even your safety. Knowing what to avoid is as important as knowing what to do. Pay close attention to these common pitfalls.
Using Wrong Cleaning Products
Never use general-purpose degreasers, oil-based lubricants, or harsh acids on your brake pads. Products like WD-40 or engine degreasers leave a residue. This residue can contaminate the brake pad material. It reduces friction. This leads to significantly diminished braking power and dangerous driving conditions. Always use a dedicated, non-chlorinated brake cleaner spray. These products are formulated to evaporate completely. They leave no residue. They are safe for brake components.
Neglecting Safety Precautions
Working on your car’s brakes requires careful attention to safety. Failing to wear safety glasses and a dust mask exposes you to harmful brake dust. This dust can irritate your eyes and respiratory system. Not using jack stands when the car is lifted is extremely dangerous. A jack can fail. This could cause serious injury or death. Always work on a level surface. Engage the parking brake. Use wheel chocks to prevent unexpected movement. Your safety is paramount.
Skipping Component Inspection
Cleaning is a good time for inspection. Many people clean the visible parts but forget to check for wear. Look at the thickness of your brake pads. Most pads have a wear indicator. If the pad material is very thin (typically less than 3-4mm), it needs replacement. Check the brake rotor for deep grooves, cracks, or excessive rust. If you find significant issues, cleaning alone will not fix them. You might need to replace components. Ignoring wear can lead to brake failure.
Maintaining Clean Brake Pads for Longevity
Cleaning your brake pads is a great start. But keeping them clean ensures long-term performance and safety. Regular maintenance practices help prevent excessive buildup. They extend the life of your brake system components. Think of it as preventative care for your car.
Regular Inspection Schedule
Make a habit of inspecting your brake pads regularly. You can do this every time you rotate your tires. Or, do it during routine oil changes. Look for visible brake dust buildup. Check for any signs of uneven wear. Listen for any new noises. Catching issues early helps you address them before they become serious problems. A quick visual check can save you significant repair costs later on.
Driving Habits
Your driving style directly impacts brake pad life and cleanliness. Aggressive braking generates more heat and brake dust. This accelerates wear. Try to anticipate stops. Brake smoothly and gradually. This reduces stress on your brake system. It also minimizes dust production. Avoiding sudden stops helps keep your pads cleaner for longer. It also extends their overall lifespan.
Professional Check-ups
Even with diligent DIY cleaning, professional inspections are important. Have a qualified mechanic check your brakes during your car’s service intervals. They can perform a more thorough inspection. They check components you might not be able to see. This includes brake fluid levels and line integrity. Professionals use specialized tools. They can identify subtle issues. This ensures your entire braking system is functioning optimally. They can also address any underlying problems causing excessive dust or noise.
FAQ Section
How often should I clean brake pads?
Clean brake pads every 6 to 12 months, or every 10,000 to 15,000 miles. This general guideline depends on your driving conditions. If you drive in dusty areas or do a lot of stop-and-go city driving, more frequent cleaning may be needed. Always clean them if you notice noise or excessive dust buildup.
Can I clean brake pads with just water?
No, water alone is not enough to clean brake pads effectively. Water cannot dissolve brake dust, grease, or oil. It can even cause rust if components are not dried completely. Always use a dedicated brake cleaner spray. It is formulated to break down contaminants without harming brake components.
What causes brake pads to get dirty?
Brake pads get dirty primarily from brake dust. This dust is a byproduct of friction as the pad material wears down. Road grime, dirt, and moisture also contribute to the buildup. Over time, these particles combine with heat to form a sticky residue. This residue accumulates on the pads and calipers.
Will cleaning brake pads stop squeaking?
Cleaning brake pads often stops squealing noises. Squealing usually comes from vibrations caused by brake dust. Removing this dust smooths the pad-to-rotor contact. If the squeaking persists after cleaning, it might indicate worn pads. It could also mean other brake system issues like caliper problems.
Is it necessary to remove wheels to clean brake pads?
No, it is not always necessary to remove wheels to clean brake pads. You can perform a lighter cleaning with the wheels still on. This helps remove surface dust. For a more thorough cleaning and inspection, removing the wheels is recommended. It provides better access to all brake components.
Can I use WD-40 on brake pads?
Absolutely not. Never use WD-40 or any other oil-based lubricant on brake pads. These products leave an oily residue. This residue contaminates the brake pad friction material. It drastically reduces your braking power. This creates an extremely dangerous situation. Only use products specifically labeled as “brake cleaner.”
Conclusion
Cleaning your brake pads is a simple yet vital part of vehicle maintenance. You now understand why it matters for safety, performance, and longevity. You know the tools you need. You also have clear steps for both quick cleanings and deep dives. Remember to always prioritize safety. Use the right products. Take time to inspect your brake components. Regular cleaning prevents frustrating squeals. It enhances your stopping power. This gives you peace of mind on the road. Do not wait for problems to arise. Make cleaning brake pads a regular part of your car care routine. Your vehicle, and your safety, will thank you for it.
- brake cleaning
- car maintenance
- DIY auto
- brake dust
- squeaky brakes